How to Make a 17-Strand Mohair Cinch
This 17-strand mohair cinch is a good project for the first-time cinch maker.
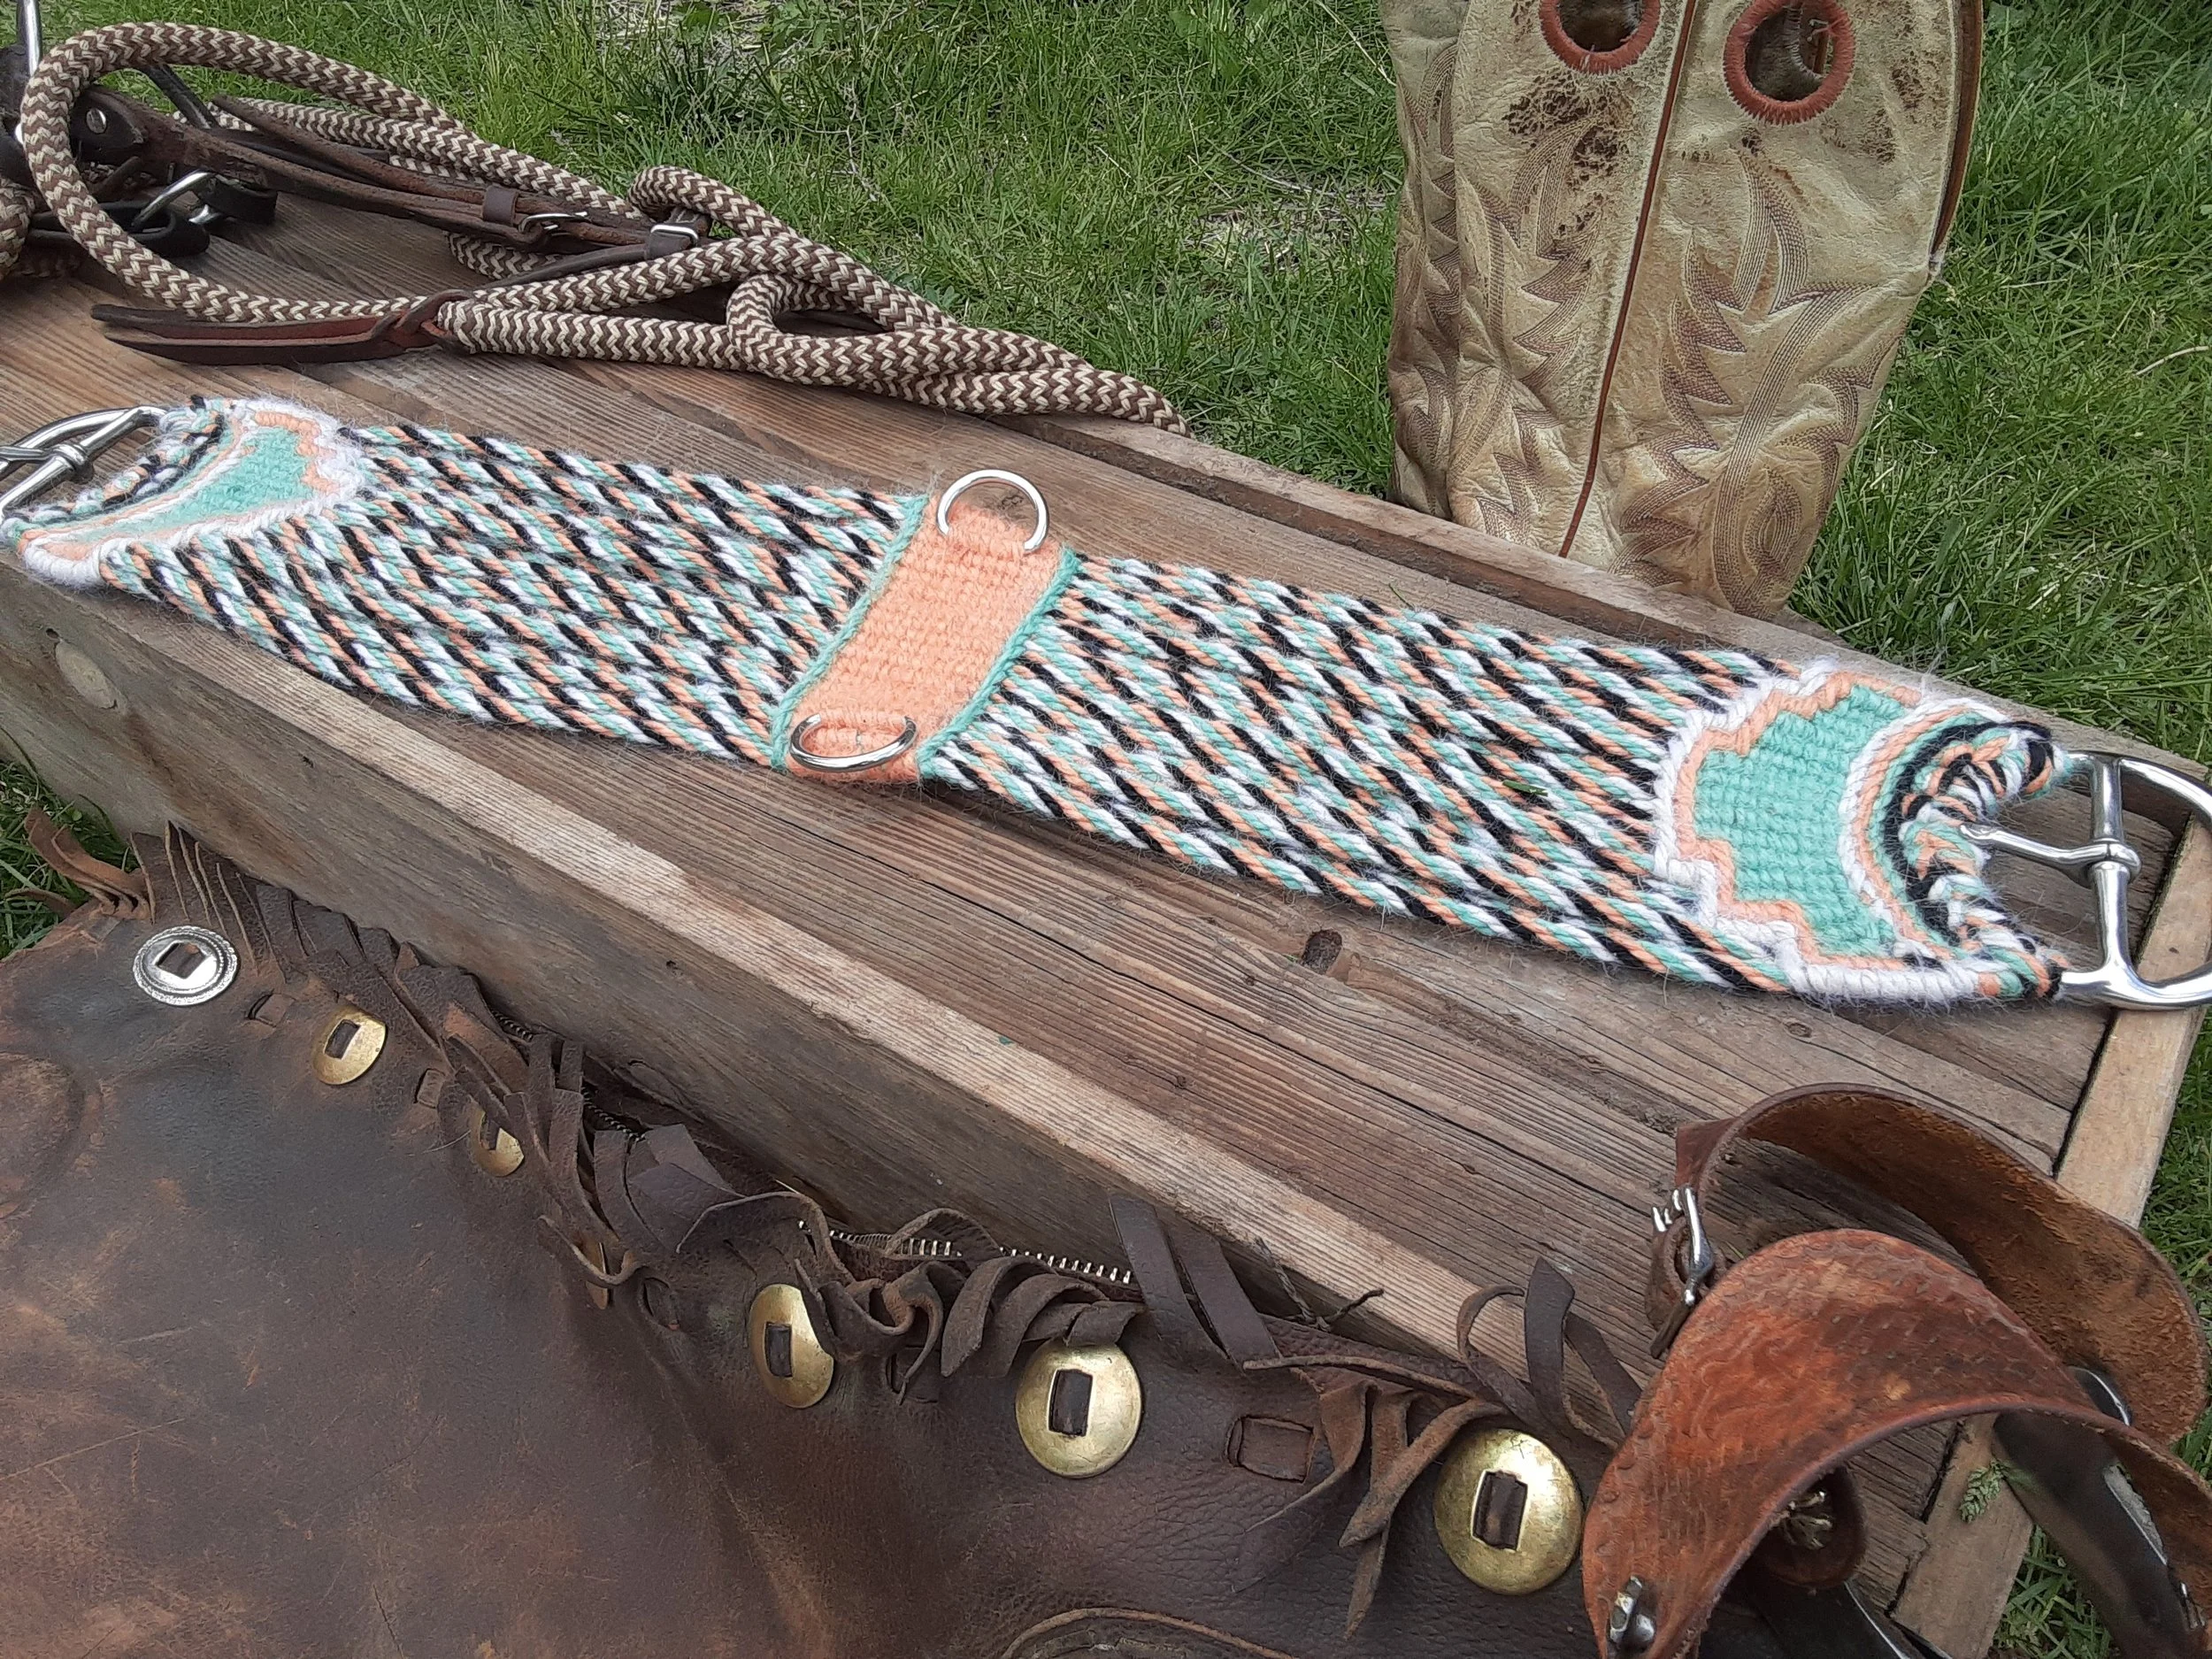
If you have managed to find your way to this page, there is a good chance you are interested in making some of your own horse gear. Making gear is a good way to learn more about tack, and allows you to create items custom to your specific horse or purpose. It’s also a good way to learn traditional artistry and keep it alive in the modern world. Around the world, horse tack has taken on many forms. However, in many horse cultures, there has always been a blend of artistry and function in the tack. Whether it is saddles or headstalls, horsemen around the world have turned their tack into more than just gear. One functional item that can easily turn into a piece of art is a mohair cinch.
A cinch (or girth if you live east of the Mississippi) is an important piece of tack that has been around as long as saddles have been around. They come in many different varieties and can be constructed from many different materials. In this article, we’ll take a look at how to make a 17-strand mohair cinch. The 17-strand design is good for a variety of disciplines and is a good project for a beginning cinch maker. Mohair is a wonderful fiber that is considered by many to be the best natural material for making cinches. With just a few basic tools, some hardware, mohair, and a few hours, you can begin constructing custom cinches for your animals. I found that U-Braid-It is a good business focused on working with mohair and a place you can get everything you need.
If you’re interested, you can watch the video I made to accompany this article.
Tools and Materials
Mohair
50’ 8 ply mohair
20’ 2 ply mohair
2 Buckles
2 Dee Rings
Scissors/Razor Knife
Tape
Pliers or Hemostats
Weaving Frame
Beating Stick
Tape Measure
Step 1 - Measure the Cinch
If you are making a cinch for your own horse and saddle, start by measuring the horse to determine how long your new cinch should be. To do this, set the saddle on the horse, with the appropriate amount of pads for riding. Measure from the D-ring on one side of the saddle, beneath the barrel of the horse, to the D-ring on the opposite side of the saddle. Take this measurement.
In order to get the cinch measurement, you’ll need to subtract the number of inches you want your cinch buckles to be from the D’s. A good rule of thumb is to have your cinch buckles roughly 8” below the D’s on both sides. That means if you subtract 16” from the measurement you will get a cinch that fits the horse appropriately. For example, if the initial measurement you took on the horse was 50”, you’ll need to make a 34” cinch. Of course, this will depend on different horse and saddle combinations. Part of the benefit of custom-making your own gear is to construct it so it will fit perfectly.
The cinch featured in the video is 32 inches.
Step 2 - Stringing the Buckles
To start making your 17-strand mohair cinch, you should begin by stringing the buckles to the loom. Start by hooking your buckles into the hooks of your loom and making sure your loom is set to the appropriate distance. Make sure the prongs of the buckles are facing up. If you do this backward, the prongs will open incorrectly, and your cinch will not work correctly.
Start stringing by tying off your 8-ply mohair to one corner of one of the buckles. Try and keep around 24” of excess tail hanging. This will be important as you weave your buckles on later. With the string tied to the buckle, next begin passing your mohair around the buckle at the opposite end of the loom. Loop it over and then pass it over the buckle at the opposite end. Repeat until you have 17 strands across.
If you have 17 strands, you will finish on the opposite buckle from which you started. Cut the string, again leaving around 24” of string.
Step 3 - Braiding on the Buckles
The next thing to do is to braid the buckles into the cinch. You can start on either end. Begin by taking your excess under the outside string on the side with the tail. Moving in one string, pass over that one. Then under the next one. Continue alternating until you have passed across the cinch. Before continuing the weave, take the beating stick and beat the row you just weaved back into the buckle. You want to make sure you get everything fitting snugly. Once you are satisfied with the fit, pass the string back, alternating over and under the strings. On this pass, you should also make sure the string is opposite of the string on your first pass. For example, if on the first pass the string went over, on the second pass it should go under. Essentially, alternate within the row and between rows.
Continue this back and forth until you have completed four rows.
Step 4 - Burying the Braid
To bury the braid, start by taking your loose end back between the last two rows. Use your hemostats or pliers to carefully separate the strands. This is important, as if you don’t pay attention, you will actually open up the 8-strand and weaken the strand. If you watch the video, you’ll see that it is also helpful to only go between a few strands at a time. Continue all the way to the end of the first row. If you have extra thread, you can continue between the 2nd and 3rd rows. Stop when you get near the edge. Pull the tail, and trim close to where the strand comes out.
Step 5 - Repeat
Repeat steps 3 and 4 on the opposite buckle.
Step 6 - Center Bar and Attach the D’s
Now you’ll want to move to the center bar of your cinch. For this, you can use the 2-ply mohair string. Begin by finding the center of the cinch and moving off-center one way to where you want your center bar to start. Then, wrap the 2-ply around one horizontal string on the outer edge and pull it until it is even. Now, you’ve basically doubled the 2-ply. You’ll also notice that one end is on top of a horizontal 8-ply string, and the other end is on the bottom. To begin the weave, take the top end and take it under the second 8-ply horizontal string, and take the bottom end and bring it over the second horizontal string. It also helps to twist them against each other. To do this, always take the top string to the left, and bring the bottom string to the right. What this does, is create a binding effect on both the 2-ply and the 8-ply string.
Continue the center bar in this fashion. When you get to one end, you can flip your loom and just continue back with the second row. To attach your D ring, just place them on top of one of the 8-ply strings and include them as if they were part of that string. I wove mine in with the 3rd 8-ply on both sides.
When you get to the end, you can bury the ends in the same way that you burried the buckle ends.
Step 7 - Design
If this is your first cinch, you may be content to keep it fairly plain. However, it’s not too difficult to add some basic design. In the video, you’ll notice that I included a pair of geometric designs near the buckles. To do this, you will use the same weave that you used on the center bar. In order to make shapes, you simply add or subtract how many horizontal strings you catch.
When complete, you should have a well-made and functional cinch that is custom fit for your horse. Part of the benefit of doing this is the custom product. However, another benefit is the skill you build and the tradition you keep alive. By making your own 17-strand mohair cinch, you’ll be part of a tradition of craftsmen who made functional art that has been helping horsemen get their jobs done for thousands of years.